Replacing a zipper, generally in a full zip jacket, is one of the most common and thus, most essential serious gear repairs you’ll do. Serious in this case being roughly defined as requiring more than tape or glue to manage. The zipper on my 4 year old Haglofs Pile hoody recently died, providing a good tutorial on how to effect this repair.

The first step in any repair is preventative maintenance. With jacket zippers, the first step here is to buy garments made from good materials. #5 YKK zips are a good place to start (# refers to size, bigger meaning larger, and the number can generally be found on the back of the slider, bottom stop, or both). #3 zippers are in full zip jackets a invitation to a short product life. Zippers fail when the materials wear, so keeping the teeth clean and not yanking too much both go a decent way towards maximizing function. When separation begins to occur (see above), often a worn slider is at fault. The metal of the slider wears ever so slightly, enough that it doesn’t fully engage the teeth when pulled up. Engage the zipper, and bend the two halves together with pliers (this page has good photos).
With my jacket, this did not get the job done. Wear to the plastic teeth, combined with fraying on the bottom stop, prevented things from seating properly, making total replacement the only option. As I outline below, this isn’t too difficult or time consuming, but it is also not the most basic repair. Companies with good warranties and repair policies (e.g Patagonia) will replace zippers, often for free. Companies with mediocre policies (e.g. OR) will usually send you a new jacket). Companies with less good policies (e.g. Arc’teryx) will often give you the run around before replacing the garment. For me repair is both better style and better for the environment. Knowing I wanted to put a beefier zipper into this specific jacket (packed size and weight not being a concern), I ordered up a #8 YKK coil zip as a replacement, and got out the knife.


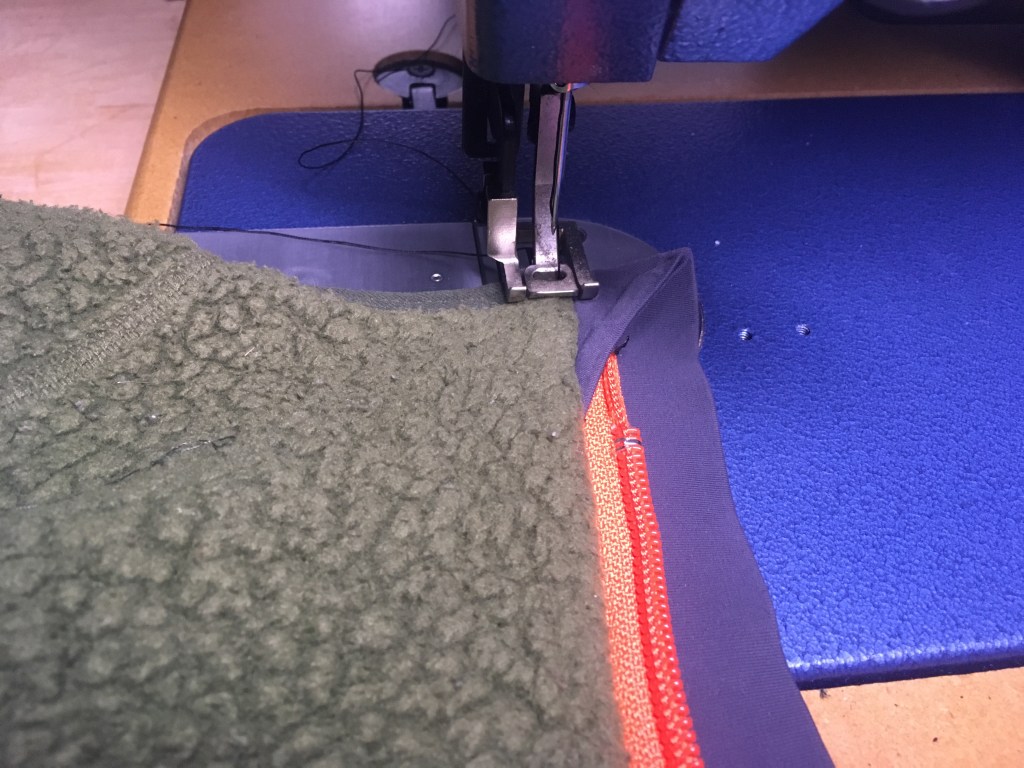
Haglofs did a good job making the zipper both well sewn in an fairly easy to remove. The strip of grosgrain is the key here: remove the little bartack on either end, cut out a few inches of stitching on one end, and at this point the thread is thin enough you can just rip the rest of the stitch line in a good yank. The zipper itself is sewn directly to the fleece with another line of stitching, similarly slowly cut out a few inches with a knife or seam ripper, then give it a rip.
The only tricky part of sewing the new zipper on is the tendency of fleece to stretch, especially if your machine doesn’t have a walking foot. Pins aren’t a bad idea to prevent this, or use stitch lines in the garment as reference marks, sewing 3-5 inches at a time and making sure the fabric doesn’t stretch. If you let the fleece stretch, the zipper will get longer than it should, and the fit will be weird. Once you’ve stitched the zipper in on either side via a plain seam, and in this case reused the zipper flap, again via a plain seam, flip the garment back right side out (top photo) and top stitch through the folded seam to lock everything in place.
Simple, easy, and now you can fix your own stuff. Once practiced this is a ~20 minute job.

Leave a comment